
I’ve had a Genesi Efika Smartbook for some time, and while it is a really nice machine, it suffers the same problem that most netbooks suffer from – the 1024×600 resolution is painfully inadequate for most tasks nowdays. Unfortunately, there is no factory option to get a higher resolution screen, or even a matte screen – the standard one is glossy which makes it largely unusable outdoors. So, I decided to try to rectify this problem.
The first thing to look for when undertaking something like this is establishing whether there are any hardware show-stoppers that will get in the way. Efika Smartbook is based on the Freescale i.MX515, and according to the spec sheets, this SoC is capable of driving a screen with resolution up to 1280×800. That is in 16:10 aspect ratio, and the Efika has a 16:9 aspect ratio, so a 1280×720 screen should work. This is a somewhat less common resolution for a 10.1in panel, but there are a few panels available, the most common being the AU Optronics B101EW01. A cursory comparison of the spec sheets of this and the default Chi Mei Optronics N101L6 revealed no obvious compatibility issues, and after a few emails, one of the Genesi engineers confirmed that this should work. And it did!
So, how difficult is the task? Well, it turns out it is very easy. In fact, this is the easiest laptop screen replacement I have ever done. It only took a few minutes. Here is how to do it.
- Unplug the battery and remove the power lead.
- Locate the four rubber pads on the screen bezel, indicated in the photo below and carefully remove them. They are attached with some soft glue and can be peeled off without damaging them, and they can be reattached without re-applying the glue, although you will probably only be able to get away with this once.
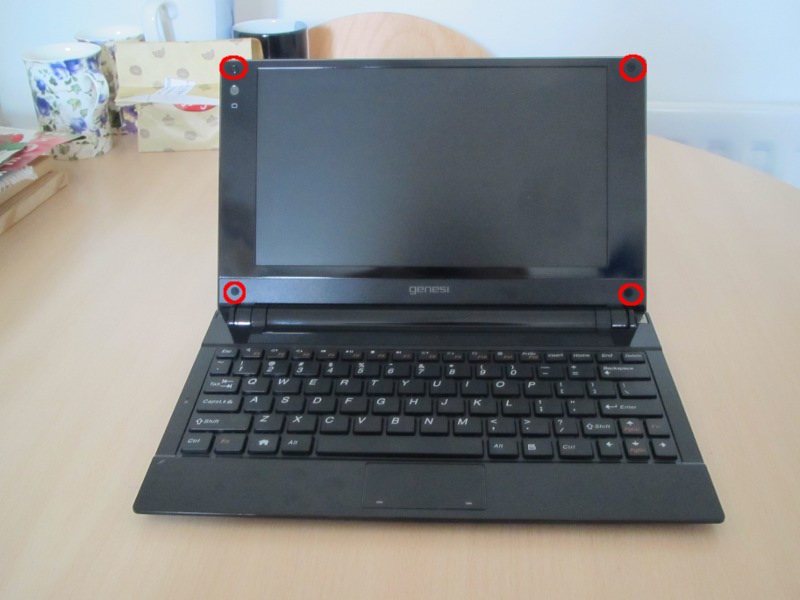
Rubber pads concealing the screws
- Once you have removed the rubber pads, remove the four screws under them.
- Exposed screen bezel screws
- Once the screws have been removed, carefully pry the bezel apart using something non-metallic (a plastic stylus or a fingernail) – if you use a screw driver you could mark the plastic, and given that the casing is very polished, it could end up being quite obvious. The bezel should come apart quite easily if you wiggle it slightly to allow the clips to find their way apart. Once the bezel has come apart, gently bend the front bit out of the way, just far enough to allow you to get a small screw driver on the four screws marked in the photo – they hold the TFT panel in.
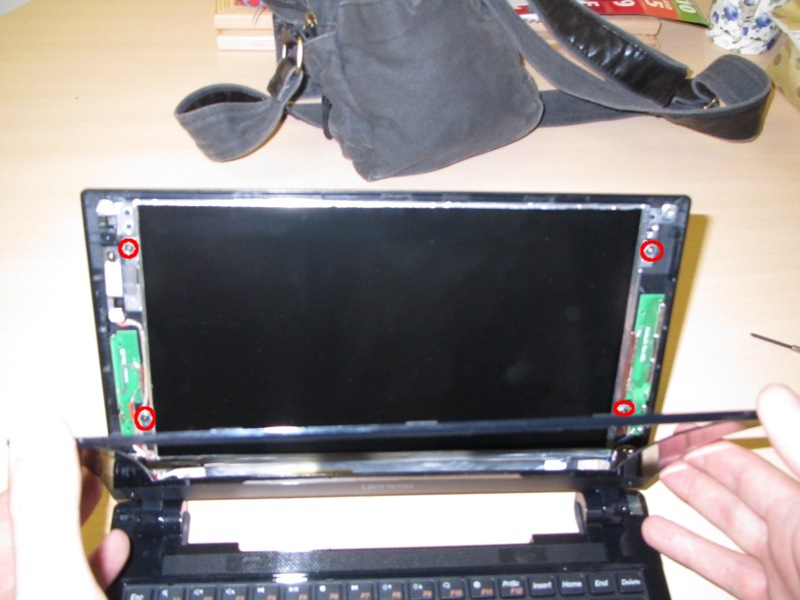
TFT panel inside the bezel
- With the four TFT panel screws removed, you can lift the panel out by a couple of inches to find the LVDS cable attached at the bottom left. There is a piece of sticky tape holding it attached to the TFT panel. The easiest way to remove it is to rotate the screen through 90 degrees anti-clockwise, unstick the tape from the screen, and gently pull the connector off.
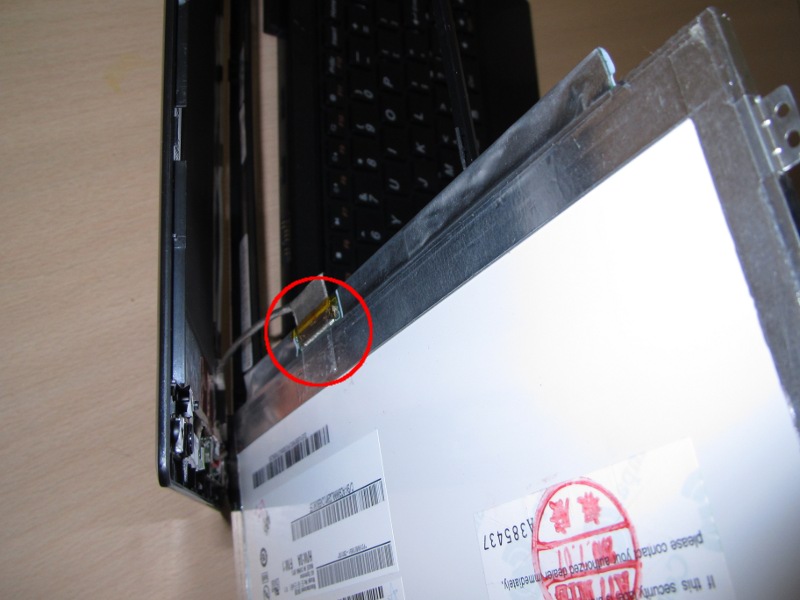
LVDS connector
And that’s it. Pop the higher resolution panel in, and follow the instructions backwards to put it all back together. After this, everything should just work. The machine should boot up and the only difference should be that more now fits on the screen.
I really wish this option was available from the factory. The difference in the cost of the 1024×600 and 1280×720 panels in 1 unit volume is approximately $15, and I would have gladly paid $15 extra for it. It would have been cheaper overall than DIY-ing it and I wouldn’t have ended up with a spare 1024×600 TFT panel that is unlikely to ever be of any use to me. I can only hope that this upgrade will become available pre-fitted on future models. Nevertheless, I am impressed that the upgrade just worked. This had not been the case with similar upgrades I attempted on an ARM based netbook from a different manufacturer. Thanks, Genesi. 🙂
Wow, nice post Gordan! Glad to hear it was so painless. I’m going to look into getting one of these screens myself. I think if I order it soon it should be here before June… or some time during.
At the time of production, the costs were much higher than on that site you pointed me to. What we’ve seen is that people say they would pay $X more if it had Y, but in reality, until the price actually reaches Z, they don’t. We’ve definitely taken it into consideration and I’ll be bringing it up again as I’ve mentioned I prefer the larger resolution myself.
Thanks Gordan, I’ve just finished the upgrade and the result looks very good. Finally I can use tabs on the left side in my browser and still view whole width of the webpages.
Gordan,
thanks for Your very interesting site.
I would like to try this myself, but by the dealer I am asked which revision the AU Optronics B101EW01 has – seems, there are 4 at the market at the moment. Can You help me with that?
Peter
Any of the variants should work fine. The two things you need to pay attention to are:
1) Glossy or matte
2) Whether the connector is on the left or on the right. You will want the screen with the connector at the bottom left when you look at it. Have a look at the pictures, you’ll see what I mean. But in terms of the pin-compatibility, they should all work.